How to switch to root using su on FreeBSD

How can a "normal" user get root rights, or actually switch to root account using the su command when working under FreeBSD?

To do that, that "normal" user needs to be in wheel group. So this command will enable a given user to be able to switch to root account with the command "su – root" or just "su – "

pw groupmod wheel -m [user]

Now that user will be able to become root. This is a good security feature that FreeBSD has, and that I did not know.


Credits

Installation of NRPE agent on Debian and Ubuntu

This article intends to give the reader a brief introduction on how to install and configure the EPEL upstream version of the NRPE agent on Debian Linux 6, 7, 8 and Ubuntu 16.04.2 LTS.

Historically, OP5 has compiled and packaged the NRPE agent for a large number of Linux distributions, but as per Q2 2014 we stopped doing this since it required a lot of maintenance and time. More information on this decision can be found here: https://www.op5.com/blog/blogs/op5-developers-blog/deprecation-notices-q2-2014/

Note that this article is intended for Debian 6, 7, 8 and Ubuntu 16.04 client hosts, and that these steps never should be performed on an OP5 Monitor server.


1. Install the NRPE package together with plugins:

# apt-get install nagios-nrpe-server nagios-plugins-basic

2. Create a new file called /etc/nagios/nrpe.d/op5_commands.cfg containing the following information:

These paths to the plugins should match the paths to the installed plugins in step 1.

################################################################################
#
# op5-nrpe command configuration file
#
# COMMAND DEFINITIONS
# Syntax:
#       command[<command_name>]=<command_line>
#
command[users]=/usr/lib/nagios/plugins/check_users -w 5 -c 10
command[load]=/usr/lib/nagios/plugins/check_load -w 15,10,5 -c 30,25,20
command[check_load]=/usr/lib/nagios/plugins/check_load -w 15,10,5 -c 30,25,20
command[swap]=/usr/lib/nagios/plugins/check_swap -w 20% -c 10%
command[root_disk]=/usr/lib/nagios/plugins/check_disk -w 20% -c 10% -p / -m
command[usr_disk]=/usr/lib/nagios/plugins/check_disk -w 20% -c 10% -p /usr -m
command[var_disk]=/usr/lib/nagios/plugins/check_disk -w 20% -c 10% -p /var -m
command[zombie_procs]=/usr/lib/nagios/plugins/check_procs -w 5 -c 10 -s Z
command[total_procs]=/usr/lib/nagios/plugins/check_procs -w 190 -c 200
command[proc_named]=/usr/lib/nagios/plugins/check_procs -w 1: -c 1:2 -C named
command[proc_crond]=/usr/lib/nagios/plugins/check_procs -w 1: -c 1:5 -C cron
command[proc_syslogd]=/usr/lib/nagios/plugins/check_procs -w 1: -c 1:2 -C syslog-ng
command[proc_rsyslogd]=/usr/lib/nagios/plugins/check_procs -w 1: -c 1:2 -C rsyslogd


3. Now edit /etc/nagios/nrpe.cfg and add your Monitor server(s) address(es) to the allowed_hosts parameter as a comma-separated list in the appropriate section:

allowed_hosts=127.0.0.1,10.0.0.10,10.0.0.11

4. Restart the nrpe agent on the host:


# /etc/init.d/nagios-nrpe-server restart

Now you can add the services via the function "Add UNIX client services" when adding a host in op5 Monitor.

If the host is behind a firewall, or you have enabled firewall software on the host, you need to open for incoming traffic on TCP port 5666.


Credits

FreeBSD Using the Ports Collection

The Ports Collection is a set of Makefiles, patches, and description files. Each set of these files is used to compile and install an individual application on FreeBSD, and is called a port.

By default, the Ports Collection itself is stored as a subdirectory of /usr/ports.

Before an application can be compiled using a port, the Ports Collection must first be installed. If it was not installed during the installation of FreeBSD, use one of the following methods to install it:

Portsnap Method:

The base system of FreeBSD includes Portsnap. This is a fast and user-friendly tool for retrieving the Ports Collection and is the recommended choice for most users. This utility connects to a FreeBSD site, verifies the secure key, and downloads a new copy of the Ports Collection. The key is used to verify the integrity of all downloaded files.

  1. To download a compressed snapshot of the Ports Collection into /var/db/portsnap:

    # portsnap fetch
  2. When running Portsnap for the first time, extract the snapshot into /usr/ports:

    # portsnap extract
  3. After the first use of Portsnap has been completed as shown above, /usr/ports can be updated as needed by running:

    # portsnap fetch
    # portsnap update

    When using fetch, the extract or the update operation may be run consecutively, like so:

    # portsnap fetch update


Credits

Install FreeBSD kernel source after installed freebsd

Install FreeBSD kernel source files, but i have already installed freebsd.

The right way to manual installed kernel source:

Download the tar file that matches the version you installed.
i386: ftp://ftp.freebsd.org/pub/FreeBSD/releases/i386/9.1-RELEASE/src.txz
amd64:ftp://ftp.freebsd.org/pub/FreeBSD/releases/amd64/9.1-RELEASE/src.txz

amd64:ftp://ftp.freebsd.org/pub/FreeBSD/releases/amd64/11.0-RELEASE/src.txz

fetch ftp://ftp.freebsd.org/pub/FreeBSD/releases/amd64/9.1-RELEASE/src.txz

Unpack the archive to /usr/src:

tar -C / -xvzf src.txz


Credits

Proxy Server

Na prática, uma máquina que se ligue através de um proxy, “obedece” às regras definidas por este e todos os pedidos (ex. páginas web, ficheiros, etc) são também feito pelo proxy que posteriormente os devolve ao cliente. Desta forma é fácil filtrar os conteúdos que pretendemos através do proxy, uma vez que todos os pedidos passam por ele.

proxy_01

O Squid oferece funcionalidades de proxy HTTP, suporte para caching de páginas web, mecanismos de controlo de acessos entre outras funcionalidades.
Como instalar o Squid Web Proxy?

Para instalar o Squid no Raspbian deve abrir o terminal e inserir o seguinte comando:

$sudo apt-get install squid

Depois de instalado, vamos efectuar uma cópia do ficheiro de configuração do Squid.

$cd /etc/squid/
$sudo –i
$cp squid.conf squid.conf.ORIG

Para simplificar o ficheiro de configuração (squid.conf), podemos retirar tudo o que é comentários ou linhas em branco. Para isso basta usar o seguinte comando:

$cat squid.conf.ORIG | egrep -v -e '^[[:blank:]]*#|^$' > squid.conf

Configuração do Squid

$nano /etc/squid/squid.conf

A configuração do squid é relativamente simples. Para isso devem proceder as seguintes alterações:

Considerando que a nossa rede interna é a 192.688.1.0/255.255.255.0, devem acrescentar no ficheiro a seguinte regra:

#acl localnet src 192.168.1.0/24

#dns_nameservers 208.67.222.222
#dns_nameservers 208.67.220.220

Para permitir que as máquinas internas acedam à rede via proxy, devem acrescentar também a seguinte permissão antes da linha #http_access deny all

#http_access allow localnet

Nota: Podem desactivar a rede 10.0.0.0/8 e 172.16.0.0/12

Depois de feitas as configurações anteriores, devem reiniciar o serviço squid.

/etc/init.d/squid reload

Para utilizar o proxy, devem aceder browser, definições, inserir a seguinte informação nas definições do proxy

    Address: 192.168.1.94  (endereço do proxy squid)
    Port: 3128

Credits

Installing Raspberry OS on the microSD and setup

Download Raspbian at https://www.raspberrypi.org/downloads/raspbian/

RASPBIAN JESSIE WITH PIXEL or RASPBIAN JESSIE LITE and extract the file.

$ unzip -x xxx-raspbian-jessie-xxx.zip

In the computer insert the SD cards. If not, insert the card into an SD card reader, then connect the reader to your computer.

Run df -h or lsblk. The new device that has appeared is your SD card.

It will be listed as something like /dev/mmcblk0p1 or /dev/sdd1.
Run umount /dev/sdd1 or /dev/mmcblk0p1, replacing sdd1 or mmcblk0p1 with whatever your SD card's device name is (including the partition number).

In the terminal, write the image to the card with the command below

Make sure the device name is the name of the whole SD card as described above, not just a partition of it; for example, sdd, not sdds1 or sddp1, and mmcblk0, not  mmcblk0p1.

$ dd bs=4M if=2017-01-11-raspbian-jessie.img of=/dev/sdd

Note: block size set to 4M will work most of the time; if not, please try 1M, although this will take considerably longer.

Remove the SD card from the card reader.

Insert the SD Card in the Raspberry and connect the power supply

After the booting

username:    pi
password:    raspberry

Change the password from the pi user
$ passwd pi

Configure the raspbian system
$ sudo raspi-config


Credits

Install TP-LINK TL-WN821N v2 on Raspberry Pi

Download firmware like this:

$sudo apt-get install firmware-linux-free

Modify the file /etc/network/interfaces :

$ sudo nano /etc/network/interfaces

auto lo

iface lo inet loopback
iface eth0 inet dhcp

allow-hotplug wlan0
auto wlan0
iface wlan0 inet dhcp
wpa-roam /etc/wpa_supplicant/wpa_supplicant.conf
iface default inet dhcp

Setup wifi by editing /etc/wpa_supplicant/wpa_supplicant.conf, insert at the of the file your wireless ssid and password

$sudo nano /etc/wpa_supplicant/wpa_supplicant.conf

network={
    ssid="YOUR_SSID"
    psk="YOUR_PASSWORD"
}

$ sudo ifup wlan0

$ sudo reboot

Credits 01 02


Fixing Missing Performance Counters from Server Manager


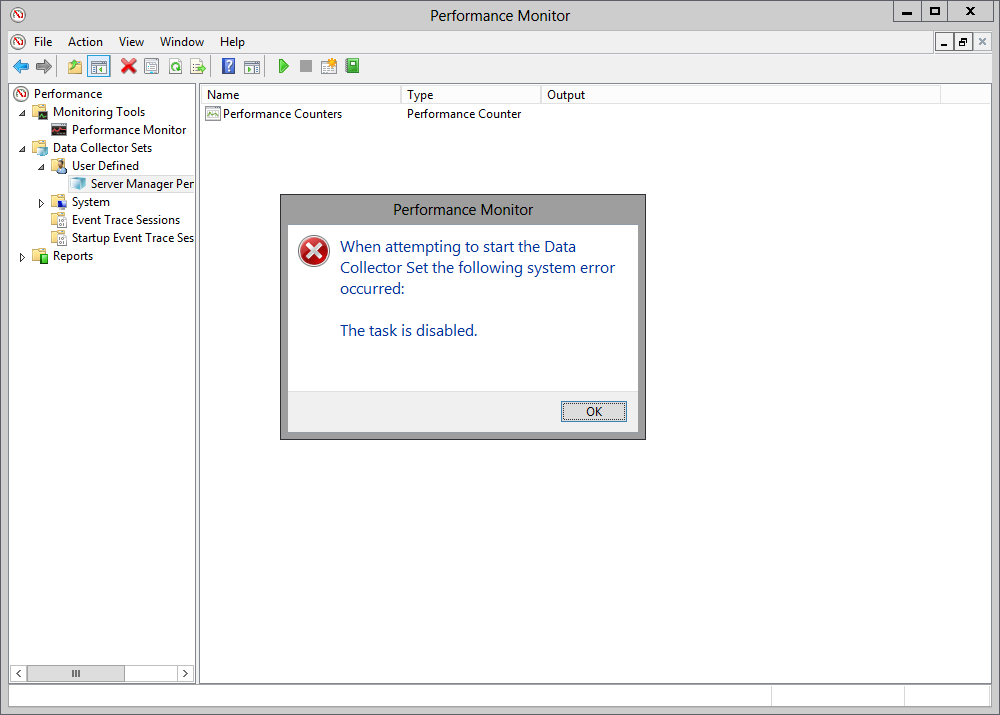
You are attempting to configure Windows Server 2012 Performance Monitor to collect data in order to analyze CPU and memory load performance of a SharePoint 2013 web front end.  In Performance Monitor, you select the default Server Manager Performance data collector set, and then click the Start button.  You then experience the error message:

When attempting to start the Data Collector Set the following system error occurred: The task is disabled.

Solution

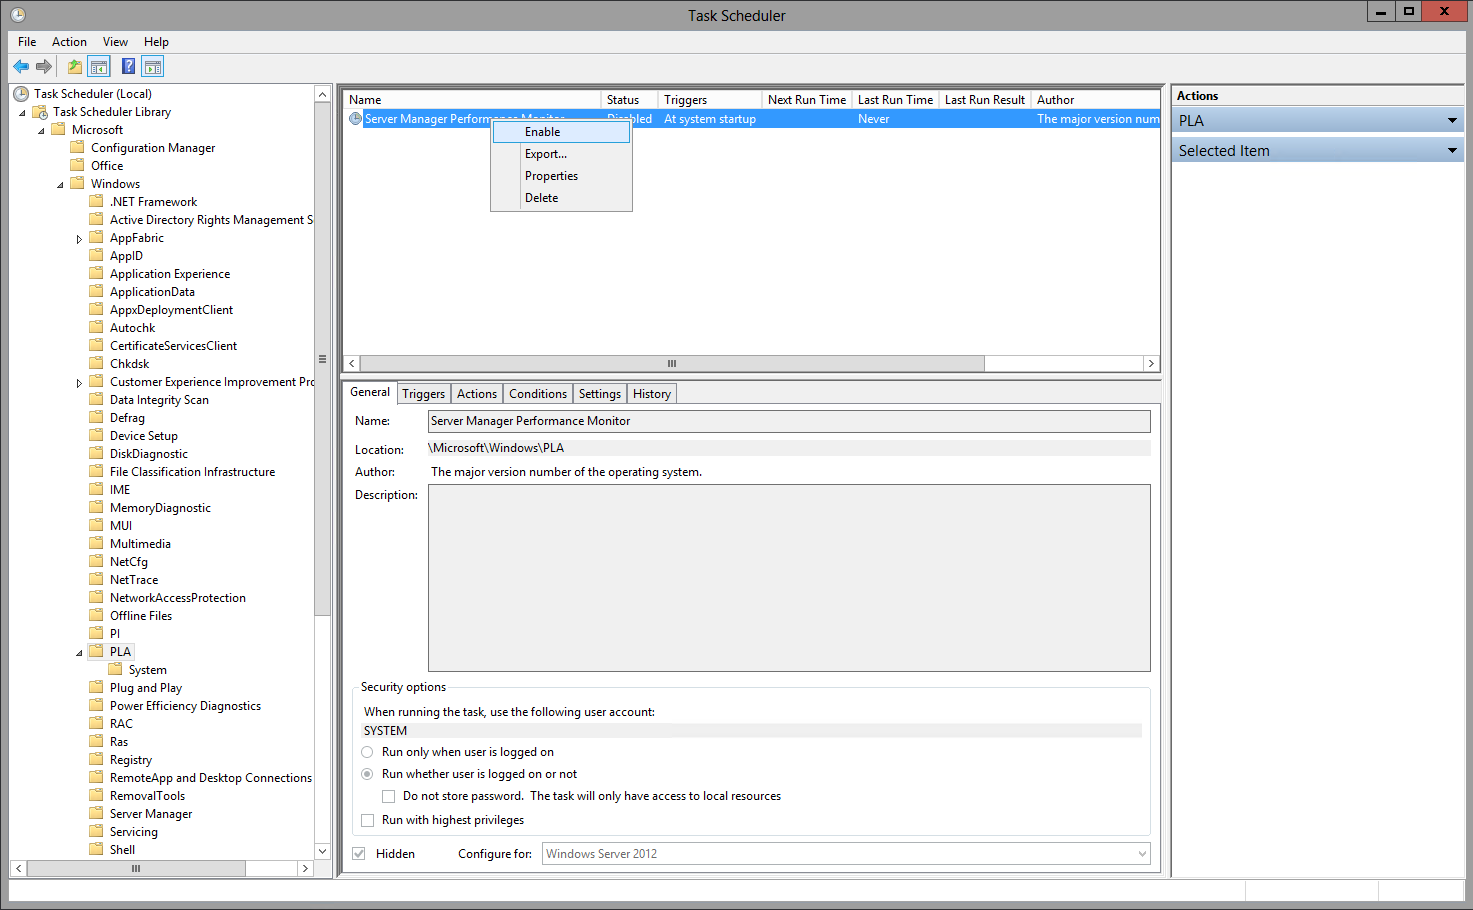
  1. Launch Task Scheduler using an account having local Administrator permissions.
  2. In the left task pane, expand the tree like so: Task Scheduler Library > Microsoft > Windows > PLA.
  3. Select the PLA group.  Note that the status of the Server Manager Performance Monitor is Disabled.
  4. In the right Results pane, right-click Server Manager Performance Monitor.  A menu appears
  5. Click Enable.  Note that now the status of the Server Manager Performance Monitor item is Ready: