Linux Laptop Power Tuning with Powertop

There’s an easy way to reduce power usage on Linux laptops using Intel’s Powertop utility.

Powertop polls your existing power usage and recommends tunings for your hardware. I’ll show you how to quickly make the most of your battery life using this tool as well as tuned and cpufreq.


Install Powertop
I’m using Fedora for these examples, but most distributions will have this available – adjust as needed.

dnf install powertop -y

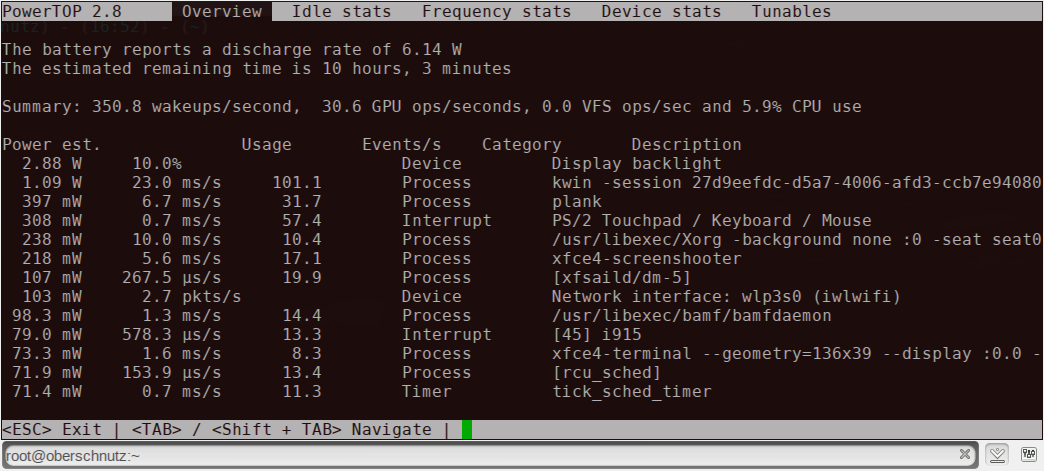
Note Normal Pre-tune Power Usage
Run powertop to see normal power usage, make sure you are not connected to a power source.

powertop

powertop-manual

Poll Usage and Record
Next you’ll want to run powertop with the –calibrate and –html flag while not connected to a power source. Note that –calibrate will disconnect you from wifi temporarily and you might see some screen flickering.

powertop --calibrate
powertop --html

You’ll see some output like below, when it’s completed you’ll have a powertop.html file wherever you ran the program.

Loaded 750 prior measurements
 RAPL device for cpu 0
 RAPL Using PowerCap Sysfs : Domain Mask f
 RAPL device for cpu 0
 RAPL Using PowerCap Sysfs : Domain Mask f
 RAPL device for cpu 0
 RAPL Using PowerCap Sysfs : Domain Mask f
 Devfreq not enabled
 Preparing to take measurements
 unknown op '{'
 Taking 1 measurement(s) for a duration of 20 second(s) each.
 PowerTOP outputing using base filename powertop.html

Output and Recommendations
Point a browser to the powertop.html file and you’ll see things like status, power usage, processes using the most power and lastly tuning. The tuning tab is what we’ll focus on.

powertop

powertop-untuned

Apply Tuning Recommendations
There’s several options you can pursue here. You can either manually copy/paste the tuning recommendations from the generated HTML tunings above or you can use lynx and a bit of sed to spit them out and apply them all. Lastly, you can just set powertop to use the –auto-tune feature (though you’ll need to run it at boot everytime). It’s best to review them all prior.

Note: you might want to forgo any USB suspend options if you use an external keyboard or mouse as USB is always slow to resume and this causes issues for some people.

Option #1 – Apply Tuning Recommendations Permanently

In this example I’ll show all tunings in an easy, copy/paste fashion to make the most of your time.

Convert HTML to TXT

lynx -dump -width 200 powertop.html > powertop.txt

Strip out Recommended Power Tunings

cat powertop.txt | sed 's/^.*echo/echo/' | \
sed 's/^.*ethtool/ethtool/' | egrep -B3 "echo|ethtool|hdparm" \
| egrep -v "Software|Description|Script" > /tmp/tuning.txt

Now review what’s been captured, you can paste these them all to apply them or choose individually as you prefer.

cat /tmp/tuning.txt | less

Note the tuning recommendations..

echo '1500' > '/proc/sys/vm/dirty_writeback_centisecs';
echo '1' > '/sys/module/snd_hda_intel/parameters/power_save';
echo '0' > '/proc/sys/kernel/nmi_watchdog';
echo 'auto' > '/sys/bus/i2c/devices/i2c-3/device/power/control';
echo 'auto' > '/sys/bus/i2c/devices/i2c-4/device/power/control';
echo 'auto' > '/sys/bus/i2c/devices/i2c-1/device/power/control';
echo 'auto' > '/sys/bus/i2c/devices/i2c-2/device/power/control';
echo 'auto' > '/sys/bus/i2c/devices/i2c-0/device/power/control';
echo 'auto' > '/sys/bus/usb/devices/8-1/power/control';
echo 'auto' > '/sys/bus/usb/devices/3-2/power/control';
-- snip --

Review the tunings.
If you like how this looks, you can also make a script to apply it all instead of pasting it.

echo '#!/bin/bash' > /tmp/tuning.sh
cat powertop.txt | sed 's/^.*echo/echo/' | sed \
's/^.*ethtool/ethtool/' | egrep -B3 "echo|ethtool|hdparm" \
| egrep -v "Software|Description|Script" >> /tmp/tuning.sh

Run the Script

chmod +x /tmp/tuning.sh
sh /tmp/tuning.sh

Option #2 – Auto Tune
Powertop provides the option to simply apply all the recommended settings for you, but they will be lost on boot.

powertop --auto-tune

Persist after boot
You can use the following systemd unit file to simply make powertop a systemd-controlled service

cat > /etc/systemd/system/powertop.service << EOF
[Unit]
Description=Powertop tunings

[Service]
Type=idle
ExecStart=/usr/bin/powertop --auto-tune

[Install]
WantedBy=multi-user.target
EOF
systemctl enable powertop

Running Powertop
You can run powertop manually at any time to get a feeling for your battery usage. It might be a good idea to see before/after improvement. For comparison I get an average of 6 to 8W of power usage under a normal workload on my Lenovo x240 running Fedora 22 on Kernel 4.2.7. I believe I average around 6-9W, down from 10-12W with no tuning – quite an improvement!

battery-best-10hr

Tuned: Further Savings
You can also use a tuned profile to provide additional power management savings.

Install tuned and Profiles

dnf install tuned-profiles-compat tuned -y

Enable Tuned and Set Profile

systemctl enable tuned.service
systemctl start tuned.service
tuned-adm profile laptop-battery-powersave

You can list other profiles available and see what works best, just “powersave” is good too.

tuned-adm list

Alternative to tuned profiles – there is also a command called powertop2tuned that will generate a tuned profile based directly on your powertop –html output, you can specify an existing html file or run it without options and it will create one. I just use the laptop-battery-powersave tuned profile instead. Below is an example where powertop-settings is the new tuned profile you’d want to use.

powertop2tuned powertop-settings
Running PowerTOP, please wait...
Generating shell script /etc/tuned/powertop-settings/script.sh
Generating Tuned config file /etc/tuned/powertop-settings/tuned.conf

Now apply the tuned profile based on powertop settings, you’d use what you named it above.
More info can be found here.

tuned-adm profile powertop-settings

Cpufreq – Further Tuning
Lastly, you will want to enable cpufreq so you can have CPU frequency scale up and down based on demand – this will save a noticable amount of power basd on the powersave profile.

Install cpufreq-utils

dnf install cpufreq-utils -y

Use Powersave Options

cpupower frequency-set -g powersave

Check your settings

cpupower frequency-info
analyzing CPU 0:
  driver: intel_pstate
  CPUs which run at the same hardware frequency: 0
  CPUs which need to have their frequency set by software: 0
  maximum transition latency: 0.97 ms.
  hardware limits: 800 MHz - 3.30 GHz
  available cpufreq governors: performance, powersave
  current policy: frequency should be within 800 MHz and 3.30 GHz.
                  The governor "powersave" may decide speed to use
                  within this range.
  current CPU frequency is 800 MHz (asserted by call to hardware).
  boost state support:
    Supported: yes
    Active: yes

Kernel GPU Savings Options (NOTE i915 chipset only)
I also use the following kernel options for my laptop, a Lenovo x240 using the Intel i915 chipset. These settings won’t work for everyone so research them before applying. If you’re not sure skip over this part.

  • file: /etc/default/grub
  • Note: this is a snippet, so make sure to append this only to your existing grub settings.
--snip append to your grub entry --
GRUB_CMDLINE_LINUX="drm.debug=0 drm.vblankoffdelay=1 
i915.semaphores=1 i915.modeset=1 i915.use_mmio_flip=1 
i915.powersave=1 i915.enable_ips=1 i915.disable_power_well=1 
i915.enable_hangcheck=1 i915.enable_cmd_parser=1 i915.fastboot=0 
i915.enable_ppgtt=1 i915.reset=0 i915.lvds_use_ssc=0 
i915.enable_psr=0 vblank_mode=0 i915.i915_enable_rc6=1"
--snip append to your grub entry --

Like usual, to apply grub changes run the following command and reboot:

grub2-mkconfig -o /boot/grub2/grub.cfg

Additional i915 Only Tunings (Lenovo x240 or similiar)
You can also pre-blacklist some modules not really needed often and force some power savings i915 kernel module options like below. These seem to further help power savings for the GPU. Note some of these are duplicated in the above kernel boot options, but we’ll force them anyways for modprobe as well for good measure.

cat > /etc/modprobe.d/x240-i915.conf << EOF
options i915 i915_enable_rc6=1 i915_enable_fbc=1 lvds_downclock=1
options iwl_wifi power_save=1 power_level=3 bt_coex_active=0 11ndisable=1

blacklist sierra_net
blacklist cdc_mbim
blacklist cdc_ncm
blacklist btusb
EOF

Further Power Savings Tips
In general the following tips apply to conserving battery:

  • Don’t use max brightness, this seems to usurp a lot of battery power.
  • Unplug your laptop when it’s fully charged, in general this prolongs the battery lifetime.
  • Use a blank screensaver.
  • Disable your ethernet kernel module if you don’t use it often, I do this via rc.local:
touch /etc/rc.d/rc.local
echo '#!/bin/bash' >> /etc/rc.d/rc.local
chmod +x /etc/rc.d/rc.local
echo 'rmmod e1000e' >> /etc/rc.local
systemctl enable rc-local.service

TLP
Some readers over at the r/linux subreddit have pointed out that TLP is a good alternative tool to, or to be used in conjunction with powertop. I’ve not tried it yet, being happy with my power savings from the above approach but please post in comments if you have any suggestions and I’m happy to merge them here. Both TLP and powertop will make the same settings, but I prefer to use the powertop approach as it’s usually best to understand/review everything you’re changing before making any changes to the system.


Credits

Installing MATE on CentOS/SL 7 from the command line

Run MATE on Centos/SL 7, I'd suggest opting for the "minimal" package option during initial installation (or at least not selecting an alternative desktop environment).

  1. Install the epel repository:
    [root@localhost ~]# yum install epel-release
  2. Install the X Window System:
    [root@localhost ~]# yum groupinstall "X Window system"
  3. Install the MATE desktop:
    [root@localhost ~]# yum groupinstall "MATE Desktop"
  4. Change systemd default.target to graphical.target:
    [root@localhost ~]# ln -sf /lib/systemd/system/graphical.target /etc/systemd/system/default.target
  5. Switch to your new desktop environment:
    [root@localhost ~]# systemctl isolate graphical.target


Credits

suricata *teste*

apt-get install build-essential module-assistant
   36  m-a prepare
   37  sh ./VBoxLinuxAdditions.run
 
Installing Suricata, Snorby and Banyard2 on Debian
 
I have used Snort quite extensively in the past and was curious about toying with Suricata which is similar to Snort but nicer in my view. It has been a few years since I looked at it. I can see the project seems to have evolved quite a lot. One functionality that I will be using down the line will be PF Ring.
 
On a lazy Sunday afternoon, I thought this was the perfect time to take a look at what it can do in its current form. I used Debian 7.3 for my tests. Everything is packaged which is quite nice though the version of suricata is a bit old on this (1.2.1 vs 1.4.7 on the website). I am very likely to make packages for this later in order to have more functionality.
 
NIC
auto eth1
iface eth1 inet manual
up ifconfig $IFACE up
#post-up ethtool -K eth1 gro off
#post-up ethtool -K eth1 lro off
 
Pre-installation requirements
 
apt-get -y install libpcre3 libpcre3-dbg libpcre3-dev build-essential autoconf automake libtool libpcap-dev libnet1-dev libyaml-0-2 libyaml-dev zlib1g zlib1g-dev libmagic-dev libcap-ng-dev libjansson-dev pkg-config apache2 apache2-dev libapr1-dev libaprutil1-dev libcurl4-openssl-dev openssl libssl-dev
 
IPS
By default, Suricata works as an IDS. If you want to use it as a IDS and IPS program, enter:
 
apt-get -y install libnetfilter-queue-dev


Once you have done the traditional apt-get install suricata
 
#apt-get install suricata mysql-server postgresql-server-dev-9.4
#mysql_secure_installation
 
 
There is not much to do to get it running, mostly edit: /etc/default/suricata and change this line depending on your network interface, and also allow it to run:
 
# set to yes to start the server in the init.d script
RUN=yes
# Interface to listen on (for pcap mode)
IFACE=br0
 
You then should grab the rules to get it all going and monitoring, check out the official page to set this up. I edited /etc/oinkmaster.conf to add the rules I wanted:
1
 
url = http://rules.emergingthreats.net/open/suricata/emerging.rules.tar.gz
 
You now need to grab the rules, a quick mkdir /etc/suricata/rules && oinkmaster -C /etc/oinkmaster.conf -o /etc/suricata/rules should fix this, and give you something like this:
 
# oinkmaster -C /etc/oinkmaster.conf -o /etc/suricata/rules
Loading /etc/oinkmaster.conf
Downloading file from http://rules.emergingthreats.net/open/suricata/emerging.rules.tar.gz… done.
Archive successfully downloaded, unpacking… done.
Setting up rules structures… done.
Processing downloaded rules… disablesid 0, enablesid 0, modifysid 0, localsid 0, total rules 18195
Setting up rules structures… done.
Comparing new files to the old ones… done.
Updating local rules files… done.
[***] Results from Oinkmaster started 20140119 18:15:26 [***]
[*] Rules modifications: [*]
    None.
[*] Non-rule line modifications: [*]
    None.
[+] Added files (consider updating your snort.conf to include them if needed): [+]
 
    -> botcc.rules
…snip…
    -> unicode.map
 
Restart the thing with a simple service suricata restart and there you are, you can leave it running on your system to learn what kind of traffic is happening. It is worth noting that default rules are set to PASS to avoid messing your traffic up. It is up to you to tune this the right way(tm).


— ??
Configure Suricata and download the rules
___ ??
 
 
Create user for snorby
 
Login to MySQL server with mysql -u root -p
 
mysql> create user 'admin'@'localhost' identified by 'admin_password';
Query OK, 0 rows affected (0.00 sec)
 
mysql> grant all privileges on snorby.* to 'admin'@'localhost' with grant option;
Query OK, 0 rows affected (0.02 sec)
 
mysql> flush privileges;
Query OK, 0 rows affected (0.00 sec)
 
mysql>
 
 
Modify MySQL config file my.cnf
By default MySQL only listens to localhost (127.0.0.1), however I want MySQL to listen to from all source addresses.
 
#nano /etc/mysql/my.cnf
 
Comment the bind-address line. Then restart mysqld service.
#
# Instead of skip-networking the default is now to listen only on
# localhost which is more compatible and is not less secure.
#bind-address           = 127.0.0.1
 
 
service mysql restart
lsof -i | grep mysqld


Snorby is a web interface that allows you see events in a nice web inteface. It will require a few things to work nicely, which you can install prior by doing: 
 
#apt-get install bundler libxml2-dev libxslt-dev libmysqlclient-dev graphviz-dev libgv-ruby wkhtmltopdf
 
Before you execute the next commands, be careful with your snorby_config.yml file and set your domain to a secure domain and random port, since this is a ruby on rails application, unless you plan on proxying it behind a http server. My 2 cents, opinions my own, etc…
 
cd /var/www/
git clone http://github.com/Snorby/snorby.git
cd snorby
bundle install
cd ../snorby/config 
cp database.yml.example database.yml
vi database.yml ( with the newly created snorby username and password)
cp snorby_config.yml.example snorby_config.yml
vi snorby_config.yml


And paste these lines:
production:
  domain: localhost:3000
  wkhtmltopdf: /usr/bin/wkhtmltopdf
 
cd initializers/
vi mail_config.rb
bundle exec rake snorby:setup
bundle exec rails server -e production


Passanger
cd /var/www/snorby
gem install rails bundler –no-ri –no-rdoc passenger
passenger-install-apache2-module -a


Now you need to set up a parser between the suricata logs and the snorby interface, this is where banyard2 comes in. The new version is hosted on github. You will need a few things to get it compiled right.
 
apt-get install flex bison
 
 
cd /opt
git clone https://github.com/jncornett/libdnet.git
cd libdnet
./configure && make && make install
 
 
wget https://www.snort.org/downloads/snort/daq-2.0.6.tar.gz
tar xvfz daq-2.0.6.tar.gz                   
cd daq-2.0.6
./configure && make && make install
 
 
cd /opt
git clone https://github.com/firnsy/barnyard2.git
cd /opt/barnyard2/
apt-get install dh-autoreconf libpcap-dev
autoreconf –install
# check out where your MySQL libs are before specifying the same folder
./configure –with-mysql-libraries=/usr/lib/x86_64-linux-gnu/
make && make install


If there were no errors, you should have a nice running setup, time to configure it to send stuff to MySQL. Edit /usr/local/etc/barnyard2.conf and change the following:
 
# set the appropriate paths to the file(s) your Snort process is using.
# cat /usr/local/etc/barnyard2.conf  | grep -n <text>
 
config reference_file:      /etc/suricata/reference.config
config classification_file: /etc/suricata/classification.config
config gen_file:            /etc/suricata/rules/gen-msg.map
config sid_file:            /etc/suricata/rules/sid-msg.map
 
Enable the interface in barnyard2.conf by Remove the comment # from config interface: line. Which looks like this:
config interface:       eth0
 
# define the full waldo filepath.
config waldo_file: /var/log/suricata/suricata.waldo
 
# database: log to a variety of databases
output database: log, mysql, user=snorbydbuser password=snorbydbpassword dbname=snorbydbname host=localhost  <??sensor_name=sensor1??>
 
 
Create the log folder for barnyard2
#mkdir /var/log/barnyard2
 
Create suricata.waldo and create the subdirectories:
 
#mkdir /var/log/barnyard2
#mkdir /var/log/suricata/ && touch /var/log/suricata/suricata.waldo
 
 
Copy the barnyard2.conf 
#cp /usr/local/etc/barnyard2.conf /etc/suricata/
 
 
You should then be able to start it and check that it works, if it does, then you can use -D to run as a daemon.
 
touch /var/log/suricata/suricata.waldo
 1234  barnyard2 -c /etc/suricata/barnyard2.conf -d /var/log/suricata/ -f unified2.alert -w /var/log/suricata/suricata.waldo -d
 
 1234  barnyard2 -c /usr/local/etc/barnyard2.conf  -d /var/log/suricata/ -f unified2.alert -w /var/log/suricata/suricata.waldo -d


barnyard2 -c /etc/suricata/barnyard2.conf -d /var/log/suricata -f unified2.alert -w /var/log/suricata/suricata.waldo -D
 
barnyard2 -c /usr/local/etc/barnyard2.conf -d /var/log/suricata/ -f unified2.alert -w /var/log/suricata/suricata.waldo -D


SystemD Startup Scrip
 
nano /lib/systemd/system/barnyard2.service
 
With the following content. 
[Unit]
Description=Barnyard NIDS Daemon
After=syslog.target network.target
 
[Service]
Type=simple
ExecStart=/usr/local/bin/barnyard2 -c /etc/suricata/barnyard2.conf -d /var/log/suricata/ -f unified2.alert -w /var/log/suricata/suricata.waldo -D
 
[Install]
WantedBy=multi-user.target
systemctl enable barnyard2
 
Reboot the computer and check that both services are started: service barnyard2 status
 
 
More on this when I have time 🙂
 
 
Note:
Default User Credentials for Snorby
 
    E-mail: [email protected]
    Password: snorby
 
 
https://www.frlinux.eu/?p=351
https://www.aldeid.com/wiki/Snorby
https://cyruslab.net/2012/10/18/building-an-ids-part-1-installing-pre-requisites-and-snorby/

install Oracle JRE openSUSE

Download the rpm installer jre-7u40-linux-x64.rpm from the oracle java site at http://www.oracle.com/technetwork/java/javase/downloads/jre7-downloads-1880261.html.

Run as root:

rpm -Uvh jre-7u40-linux-x64.rpm
update-alternatives –install "/usr/bin/java" "java" "/usr/java/jre1.7.0_40/bin/java" 1
update-alternatives –set java /usr/java/jre1.7.0_40/bin/java
update-alternatives –install "/usr/lib64/browser-plugins/javaplugin.so" "javaplugin" "/usr/java/jre1.7.0_40/lib/amd64/libnpjp2.so" 1
update-alternatives –set javaplugin /usr/java/jre1.7.0_40/lib/amd64/libnpjp2.so
 
Now check:

update-alternatives –list java
update-alternatives –list javaplugin
update-alternatives –config java
update-alternatives –config javaplugin

Credits

Domain Trust Relationship Failed

Log on to the computer using a local administrator account.

Run PowerShell as Administrator.

Enter the following command to prompt for domain credentials.

$credential = Get-Credential

A security prompt will appear. Provide domain credentials with administrative permissions over the computer account.

Enter the following command to reset the computer account password.

Reset-ComputerMachinePassword -Credential $credential

Close PowerShell and log off.


Credits

Understanding the Authenticated Users Group

Authenticated Users isn't a true group—it's a special security principal that specifies any session that's been authenticated using some account, such as a local SAM account, domain account, or account from any trusted domain. So Authenticated Users does include the accounts you mention.

Microsoft created the Authenticated Users group in response to fears that Anonymous logons could gain access to objects for which Everyone (another special security principal) has access. I don't recommend using the Authenticated Users group for controlling permissions because it includes local accounts, which are a bad practice to use because you can't centrally manage them at the domain level, and they use NT LAN Manager (NTLM) authentication rather than the stronger Kerberos. Also, the membership of Authenticated Users changes dynamically when you create a trust to another domain. When you want to give all users in a domain access to a resource, I recommend that you use the Domain Users group, which limits membership to the domain. If you need to give all users in a forest access to a resource, create a universal scope group called Forest Users and add each domain's Domain Users group as a member.

Conclusion

When it comes to permissions, one critical question we need to be able to answer is: which humans have access to a particular resource?

Most of the time when you’re inspecting permissions on a given resource in Windows you’re not dealing with humans (this is actually a best practice); rather, you’re dealing with groups, some of which are built-in implicit identities with ambiguous names. As a result, we often have to do quite a bit of digging to get what we need.

Credits

Virtualbox alterar o uuid do harddrive

Erro “UUID Already Exists” ao registrar o HD virtual no VirtualBox

  • Criou uma máquina virtual no VirtualBox;
  • Para criar uma segunda VM e aproveitar a primeira VM como ponto de partida;
    • Copia o VHD/VDI/VMDX e adiciona à nova máquina virtual;
  • Surge o Erro “UUID Already Exists”, porque o VirtualBox cria um identificador único (UUID) para cada disco virtual;
  • Deve ser gerado um novo UUID para a cópia do HDD.

  • Na prompt, executar o seguinte:

    1
    VBoxManage internalcommands sethduuid HDD.vhd